$ curl -s http://get.sdkman.io | bashTutorial 1::Getting Started
Agenda
This tutorial describes how a Griffon 2 application can be created and run. IDE configurations are discussed too.
1. Getting the ToolChain
The first step is to get the tools needed to create an application. While it’s possible to create a Griffon 2 application from scratch it’s also true that the power of conventions allows you to get faster development cycles. We need the following tools:
SDKMAN
SDKMAN is a tool for managing parallel Versions of multiple Software Development Kits on most Unix based systems. It provides a convenient command line interface for installing, switching, removing and listing Candidates. The candidates we’re interested in are Lazybones and Gradle.
| You can run SDKMAN on Windows as long as you have a POSIX environment. We recommend you to give Babun Shell a try first. |
Installing SDKMAN is as easy as executing the following command
This will download the required files and configure your environment. After this the sdk command should be available.
You can verify your setup by executing this command
$ sdk helpLazybones
Lazybones is a command-line based tool for creating basic software projects from templates. It’s similar in spirit to Maven Archetypes, however Lazybones templates can do much more than that, for example, new files can be created from scratch, even long after the project was created.
Execute the following command to install Lazybones on your system
$ sdk install lazybonesVerify your setup by invoking the following command
$ lazybones helpAs mentioned before, Lazybones relies on templates in order to create a project. There are a handful of templates
available at the default Lazybones location. The Griffon based templates reside at a different location, so they
must be configured in order to be found. Lazybones uses a simple configuration scheme for defining repositories,
as up to version 0.8 this configuration is kept in a Groovy script whose standard location is
$USER_HOME/.lazybones/config.groovy.
Windows users should use the %USER_HOME%\.lazybones\config.groovy path.
|
Griffon project templates are hosted at a Bintray
repository, similarly as the standard Lazybones templates. Create the config.groovy file at the specified location if
it doesn’t exist, place the following content on it
bintrayRepositories = [
    'griffon/griffon-lazybones-templates',
    'pledbrook/lazybones-templates'
]
The Griffon project templates should be available now. You can verify this step by executing the following command
$ lazybones list
Available templates in griffon/griffon-lazybones-templates

    griffon-javafx-groovy
    griffon-javafx-java
    griffon-javafx-kotlin
    griffon-lanterna-groovy
    griffon-lanterna-java
    griffon-pivot-groovy
    griffon-pivot-java
    griffon-plugin
    griffon-swing-groovy
    griffon-swing-java
Gradle
Gradle is an open source build automation system. Gradle can automate the building, testing, publishing, deployment and more of software packages or other types of projects such as generated static websites, generated documentation or indeed anything else.
You can download and install Gradle manually, however we recommend using SDKMAN for this task too, as it greatly simplifies handling different versions and keeping binary distributions up to date. You can install Gradle via SDKMAN by executing this command
$ sdk install gradleOnce installed you can verify that’s working by invoking this command
$ gradle --version
------------------------------------------------------------
Gradle 3.0
------------------------------------------------------------

Build time:   2016-08-15 13:15:01 UTC
Revision:     ad76ba00f59ecb287bd3c037bd25fc3df13ca558

Groovy:       2.4.7
Ant:          Apache Ant(TM) version 1.9.6 compiled on June 29 2015
JVM:          1.8.0_102 (Oracle Corporation 25.102-b14)
OS:           Mac OS X 10.10.5 x86_64
Gradle 2.13 is the minimum supported version.
Maven
Maven is a software project management and comprehension tool. Based on the concept of a project object model (POM), Maven can manage a project’s build, reporting and documentation from a central piece of information.
You can download and install Maven manually, however we recommend using SDKMAN for this task too, as it greatly simplifies handling different versions and keeping binary distributions up to date. You can install Maven via SDKMAN by executing this command
$ sdk install mavenYou can verify this tool by executing this command
$ mvn -v
Apache Maven 3.3.1 (cab6659f9874fa96462afef40fcf6bc033d58c1c; 2015-03-13T21:10:27+01:00)
Maven home: /usr/local/maven
Java version: 1.8.0_102, vendor: Oracle Corporation
Java home: /Library/Java/JavaVirtualMachines/jdk1.8.0_102.jdk/Contents/Home/jre
Default locale: en_US, platform encoding: UTF-8
OS name: "mac os x", version: "10.10.5", arch: "x86_64", family: "mac"
Maven 3 is the minimum supported version.
IDE
All major IDEs can be used to build Griffon applications. Considering that the Griffon tool chain is comprised of tools that can be invoked from the command line you may want to use a text editor (such as VIM) instead.
2. Creating an Application
With the tool chain ready we can now create an application. The Griffon templates provide a starting point depending on a particular UI toolkit / programming language combination. Currently supported UI toolkits are
-
Swing
-
JavaFX
-
Pivot
-
Lanterna
While the currently supported programming languages are
-
Java
-
Groovy
-
Kotlin
In this tutorial we’ll go for the most basic combination: Swing and Java. Execute the create Lazybones command
using the griffon-swing-java template as the starting point. Note that the template uses sensible defaults
for most of its options, however ou can change them to suit your needs. Here’s how a creation session looks
$ lazybones create griffon-swing-java sample
Creating project from template griffon-swing-java (latest) in 'sample'
Define value for 'group' [org.example]:
Define value for 'artifactId' [sample]:
Define value for 'version' [0.1.0-SNAPSHOT]:
Define value for 'griffonVersion' [2.11.0]:
Define value for 'package' [org.example]:
Define value for 'className' [Sample]:

...
Project created in sample!
Change into the sample directory and inspect its contents. You’ll see it contains a build.gradle file that
can be used to build the project with Gradle. There’s also a pom.xml if you prefer Maven. The standard structure
of a Griffon application looks like this
.
├── build.gradle
├── griffon-app
│   ├── conf
│   ├── controllers
│   ├── i18n
│   ├── lifecycle
│   ├── models
│   ├── resources
│   ├── services
│   └── views
├── pom.xml
└── src
    ├── integration-test
    │   └── java
    ├── main
    │   ├── java
    │   └── resources
    └── test
        ├── java
└── resources3. Running the Application
The application is fully functional at this point. You just have to select your build tool of choice and invoke the right command for it. In the case of Gradle this is a simple as executing
$ gradle runProject dependencies get downloaded, classes are compiled and a small window pops up after a few seconds. Maven has a similar workflow, the Griffon master application pom has simplified building tasks by providing a lot of plugins and profiles that follow the conventions. Running the application with Maven is as easy as executing
$ mvn -PrunThe master pom uses a profile to make sure that classes and resources are properly handled before the application’s main class is run inside a JVM process.
4. Setting up the IDE
Configuring IDEs is not that difficult considering that Griffon 2 projects can be imported either as Gradle or Maven projects, in other words, there’s no need for a special IDE plugin to build and run a Griffon 2 application.
| Both IntelliJ IDEA and NetBeans have a Griffon plugin (IDEA has it installed by default). These plugins were designed to work with Griffon 1 and are incompatible with Griffon 2. Do not use these plugins to work with Griffon 2 projects! |
IntelliJ IDEA
You can import a project either using the Gradle or Maven import. Once you do you’ll be able to invoke build goals using the respective build tool view.
| Mac OSX users must run IntelliJ IDEA using JDK7 (the default is JDK6 in Intellij 15) otherwise the Gradle plugin will not be able to import the project and will fail with a cryptic error. |
You must also have Annotation Processing enabled for compile time annotations such as @ArtifactProviderFor to be picked
up automatically. Open up Preferences and navigate to Build, Execution Deployment > Compiler > Annotation Processors
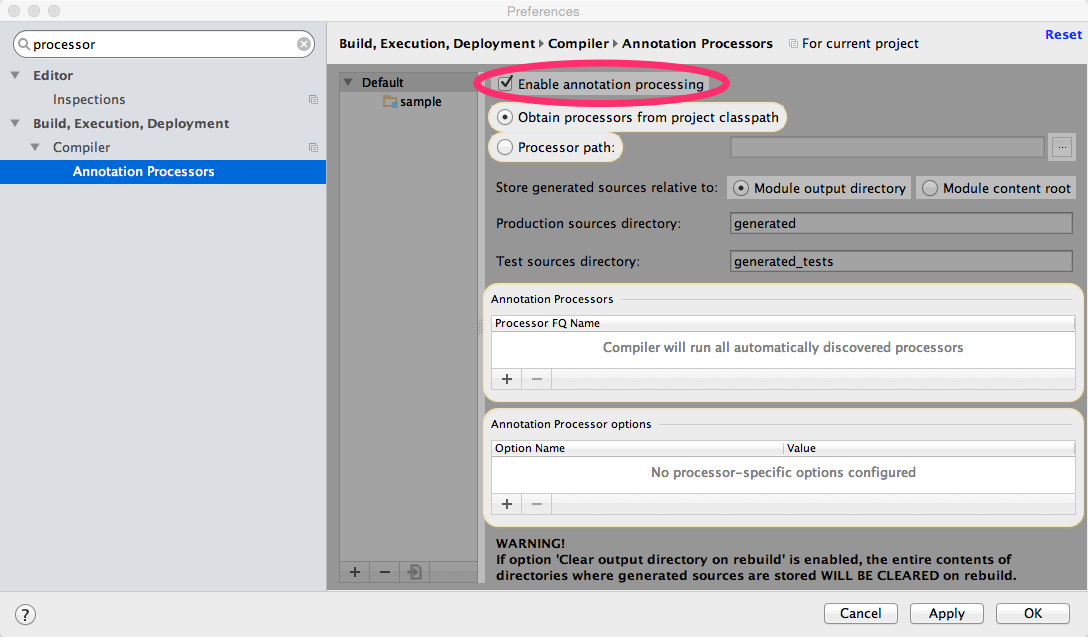
Figure 1. Annotation Processing in IntelliJ
Finally, check that all *-compile JARs are added in the PROVIDED scope, also jipsy-0.4.0.jar and gipsy-0.4.0.jar.
NetBeans
NetBeans can import Maven projects without additional plugins. You must install the Gradle plugin first if you want to build Gradle based projects. The Gradle plugin is directly accessible from the default plugin location as configured in the Plugins preference panel.
NetBeans is able to pick up Annotation Processors automatically from the classpath, there’s no extra step needed.
Eclipse
Unfortunately Eclipse is the odd member of the three IDEs. You must locate and install the m2e (Maven) and gradle plugins that are compatible with your current Eclipse installation. Once you do, you will be able to import the project directly into your workspace.
You must also install the Gradle Buildship and Groovy plugins from the marketplace
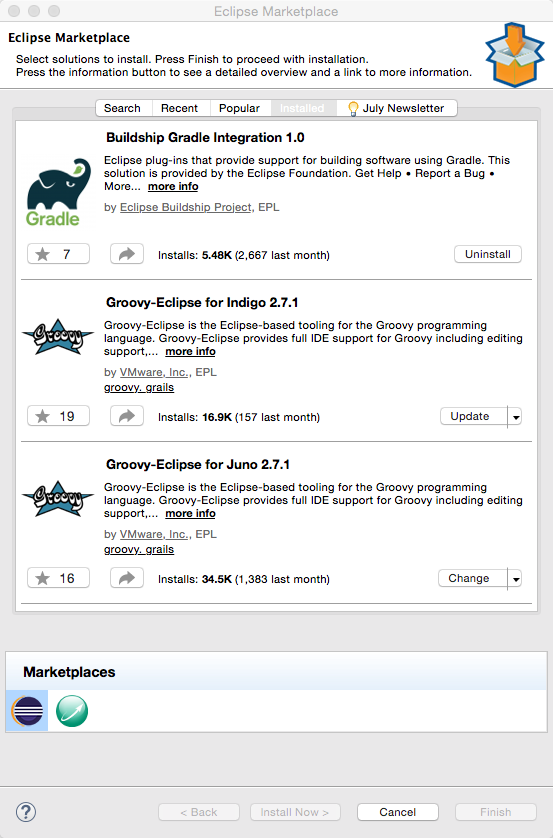
Figure 2. Required Eclipse Plugins
Finally, Annotation Processing must be manually enabled. You must do this in a per project basis. Search for Annotation Processing in the project’s properties and tick the checkbox to activate this option.
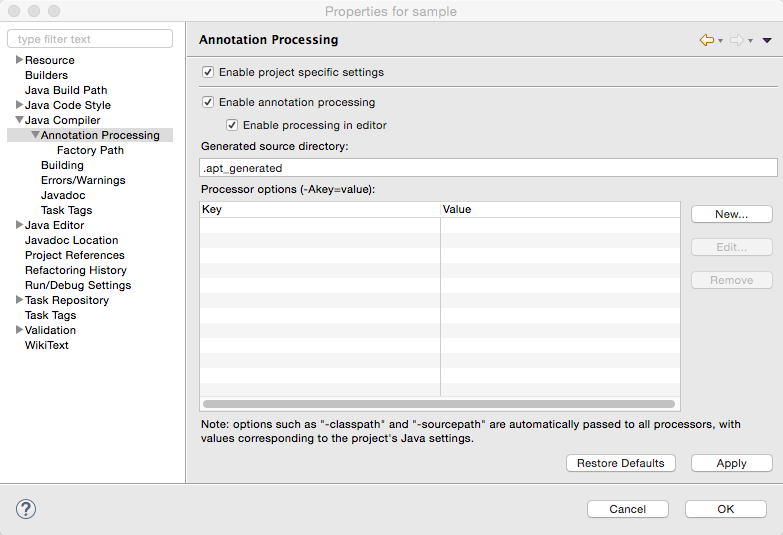
Figure 3. Annotation Processing in Eclipse (1)
You must also define every single JAR file that provides APT processors. The most basic ones ar jipsy and
griffon-core-compile. These JARs are found in your build tools' cache and/or local repository.
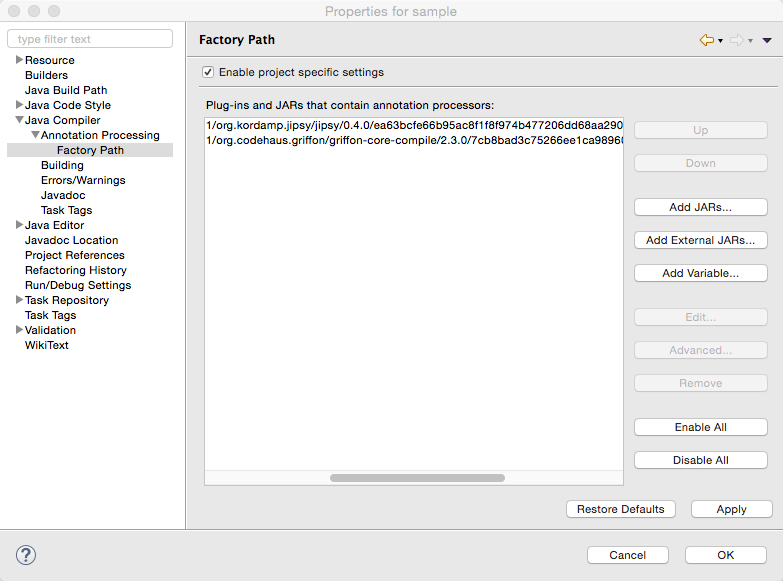
Figure 4. Annotation Processing in Eclipse (2)
As a rule, all griffon-*-compile JARs provide APT processors and AST transformations.